|
I love reviewing salon products. I test the products on my own thick, curly, slightly frizzy, color enhanced hair and on other types of hair when it is possible.
The first thing I noticed when I received Orchids Oil by White Sands was the very attractive packaging. The frosted glass bottle with silver lettering and cap more closely resembles a bottle of fine perfume than it does a hair product. The tiny picture of an orchid adds just the right touch of color.The bottle is designed to inhibit the flow of the product, allowing only a small amount to escape. I found this helpful when using a few drops of Orchids Oil on dry hair but more difficult when collecting the prescribed nickel sized amount to be used on wet hair.
Final thoughts: I liked the results of using Orchids Oil. It is very light and is perfect for fine hair – imparting a healthy frizz free look while leaving in the body. My hair has more natural body than I like, so I will most likely use Orchids in combination with other heavier products. Orchids Oil was provided to me free of charge for review by Janice McCafferty CommunicationsI love reviewing new salon products. I test the products on my own thick, curly, slightly frizzy, color enhanced hair and on other types of hair when it is possible.
0 Comments
The bob haircut is an ever fashionable style that first made its appearance in the 1920's and has reappeared, as the trend, many times since. The style was, at first, shocking as women who previously prided themselves on long, luxurious hair, chopped off their locks in a show of independence and equality with men. The original style was worn straight and flat on top or waved with a Marcel iron.
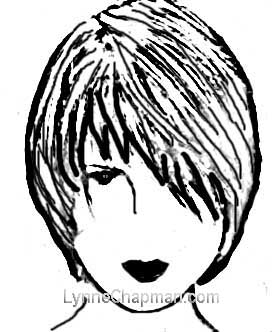
A style is a 'bob' if it is cut with a weighted area falling anywhere from just below the ears to just below the chin. Although the bob has faded from the style front on occasion it has always been in the back-ground showing sophistication and class. Vidal Sassoon made such a hit with his severe and sculpted adaptation of this style that many think that it originated with him. The most interesting thing about the bob is that it has been updated and modified for many style trends but with each come-back, the original look is still as acceptable as the new styles. This style is adaptable to many facial structures and textures of hair. This, along with the ease of styling most adaptations are likely reasons for its tendency to keep reappearing on the style scene. Over the years, the cut has been modified by adding bangs or taking them away, stylized by cutting one side short while leaving the other long, texturized, permed, waved, poofed and flattened, but it is always unmistakably a bob. Curly or straight, there is a bob haircut to fit just about every face and life style. So if you are looking for a new look that is sophisticated and stylish as well as appropriate for the office and easy to care for, there is very likely a bob that is perfect for you. The bob hair cut is one of the most popular all time hair styles. It has been popular in every generation and has gone through many changes in shape and mood. Currently, any style bob cut is in style and can be formed to your personal taste. In fact you can change the look of your bob hairstyle to be uniquely yours by changing the look of your bangs – also called fringe. The shape and length of the bangs can serve to flatter or to detract from certain features. 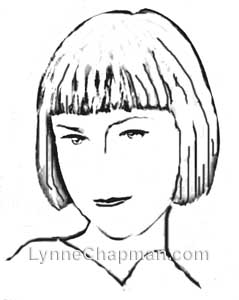 Narrow face, small eyes, long face These short bangs are also sometimes referred to a baby bangs. As the name implies, you give a youthful appearance to the hairstyle. Since they are short, they expose more area around the eyes. This draws attention to well shaped eyes or eyes of a beautiful color. It also causes the eyes to appear larger. Short bangs that are cut fairly straight across serve to add width to the forehead. This is flattering to a narrow face shape. To add less width, angle the bangs down at the sides or create a more narrow bang section that does not extend as far into the temple. The short bangs will also be more apt to add length to the face than bangs that are trimmed at or below the eyebrow. 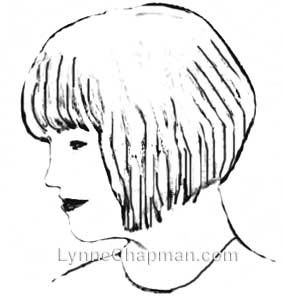 Narrow face, Long face, large features These bangs are trimmed at or below the eyebrows giving a more sophisticated and dramatic look. This type of bang will sometimes tend to conceal the eyes rather than accentuate. When these bangs are heavy, they can have an overpowering effect to a face with small features. Texturizing this type of bang will soften it and lessen the overpowering effect. This type of bang will also add width to the face as discussed above making it flattering for a narrow face shape. 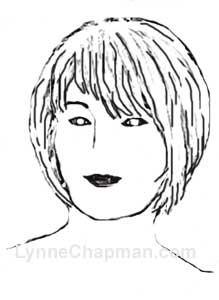 Oval face, Wide face, Round face This layered bob has soft layered bangs. The layering adds fullness and height to the top of the head and forehead. The layering causes the sides to cling closer to the sides of the face. This style is flattering to a wide or round face shape. The odd lengths in the bangs “open up” one eye giving the face an illusion of length, while draping over the other eye giving the style sophistication and drama. 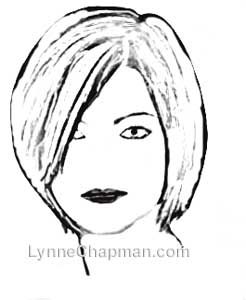 Wide face, Round face, Triangle or Square face The long side bang is the most dramatic of this set. The bangs are trimmed to a level that is just below the cheek bone, causing the forehead to appear more narrow and calling attention to the lips. The angle of the bangs adds length to the face the illusion of height. This style is flattering to a triangle, square, or round shaped face. 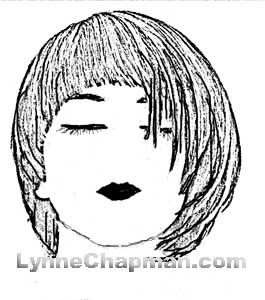 You don't have to settle for bangs (fringe) like everyone else.
Be creative. Be you. 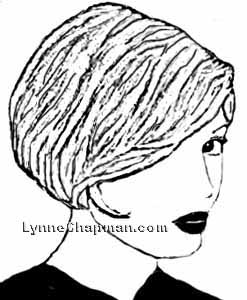
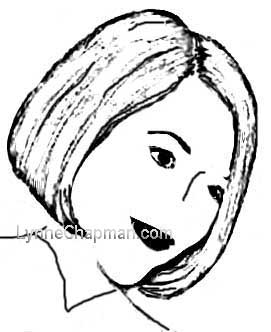
The bob hairstyle is one of the most popular hairstyles today and is easily the hairstyle with
the most longevity. The first bob made its appearance on the fashion scene in the 1920's. There has been some sort of bob in fashion in almost every season's style trends since then. The bob is not only fashionable, sophisticated and easy to style, there is a style of bob that will fit every face shape. Those of you who are fortunate enough to have an oval shaped face with its symmetrical features can wear any of the bob styles but if there are problem areas, you may find some help here.
Heart Shaped Face, Oblong Face Shape, Long & Narrow, or Pointy Chin
The classic bob is all one length with the blunt perimeter falling anywhere between ear length and chin length. At all one length, it is flat on top and calls attention to wherever the ends fall – that being either the cheek bones, jaw or chin. This style is best worn by someone with an oblong face, long and narrow face or someone with a narrow or pointy chin. This bob is a good choice for someone with a heart shaped face. If your face is wide in the chin area, such as a square chin or a round face or pear shaped face shape, I suggest choosing one of the other bob styles.
Round or Square Face Shape
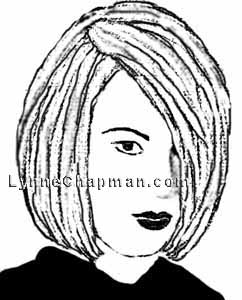
This bob hairstyle is all one length with one side trimmed at ear level and the other side falling at just below the chin. The part is usually worn on the short side allowing the other side to be dramatically long. This bob can be effective for the woman with a round or square face shape. The asymmetrical styling draws the attention away from a wide of full face. 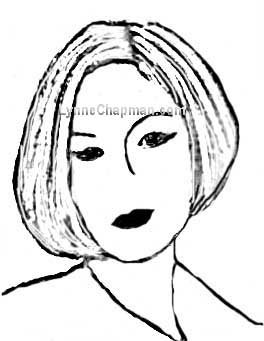
Triangle Face Shape, Pear Shaped, or Mature Face
This layered bob can be worn by someone whose face is narrow at the top. The bangs help to add width. The layers give the top and sides fullness. This is very effective in drawing the attention up and helping to give the face an uplifted look. It will draw attention away from a full chin or jaw line and also away from sagging skin in someone with a more mature face.
Do you have an area in your hairstyle that doesn’t seem to go with the rest of your hair? Does it seem as if part of your hair doesn’t belong with the rest? If so, you may have Multi-textured hair.
Multi-textured hair is having straight hair with one strand that insists on waving or curly hair that has straight areas, or very thick hair beside thin hair, etc. . If you are blessed with this combination hair, be assured that you are not alone. You may have had the experience of having a hairdresser style it to perfection only to find that it is impossible for you to style at home. This type of hair will always be difficult but with patience and the correct products and styling aids and with patience you will be able to control it. Check out the case study below. Let me tell you about one of the most challenging of my clients. Alice’s naturally curly hair is of very uneven texture. The crown area is very curly with a strong tendency toward frizziness. It is also very thick in this area. The bang area is slightly less curly while the hair at the sides is almost straight, fine and somewhat thinner. The nape section is yet anther texture with medium to light curl and medium thickness. Because of the uneven curl and the frizziness of the crown, Alice prefers not to wear it curly and would most like a smooth, bob, with some piecey layers. As always, I start with a shampoo formulated for the hardest to control sections. In this case I choose a moisturizing shampoo and conditioner to help prevent frizziness. I apply the conditioner to the top and crown only, rinse well and towel dry. Next I apply Artec Kiwi blow silk to the top and crown for added shine and frizz control. Over this I use Matrix Sleek Look Lite Styling Crème to further help with smoothing and to lock out humidity. Moving on to the sides and the nape area, I use Artec’s Control Gel to build body and to make the hair look thicker, improving the balance of the hair style. To blow dry the top and crown, I use a large round brush with lots of bristles to smooth out the curl. A vent brush and my fingers work well on the sides and nape to build body while it is being blown dry. I follow up with a narrow flat iron, pulling it from the root to the ends to remove excess fluff from the top, Often a curling iron is needed to add body and curl to the back and sides. I add the finishing touches with a little pomade or hair wax to separate some strands for a piecey look and finish with Sleek Look Water-free Lock Down hair spray to lock out humidity. So in summation, take heart, those of you with Multi-texture hair! Simply treat each individual texture according to its own needs and experiment with products until you find the ones that work best for you. Beautiful hair begins with choosing the right shampoo and conditioner. Products formulated for your hair texture can make the difference between fabulous hair and an ordinary 'do'. People have been searching for hair loss remedies for centuries. Topical applications, shampoo, conditioners and stimulation all have some degree of success but none of them have been shown to result in a natural full head of hair.
Those who are looking for a better solution to baldness can be more assured of the results with Hair Transplantation. This is a proven procedure that has performed since the late 1950's with techniques being perfected since that time. Transplantation is a surgical procedure that removes hair from the back and sides of the head, (where the patient has plenty of hair) and transplants it to the balding or thinning areas. The "donor" area is anesthetized and a strip of scalp tissue about one-half to one inch wide and four or five inches long is removed. The donor area is sutured together and heals leaving only a thin line that is covered by the hair from surrounding areas that grows over it. That strip that has been removed is divided into many grafts, some containing as few as one or two hairs. These grafts are implanted into the balding area and are accepted and fed by the body. You may know that the chemical DHT causes hair loss in many men and some women. DHT occurs naturally in the body. Amazingly the grafted hairs are not susceptible to DHT and will grow for a lifetime requiring no further special care.
As much as I love hair – styling, cutting, coloring – everything about it; there is some hair that I don’t like. It is on my chin or on my lip or an excess of fine hair on my cheeks.
I have found that as I mature, this hair becomes more noticeable. This is the hair that has to be removed regularly. I am going to tell you about two gadgets that are great for removing that irritating and unwanted hair. Both gadgets are safe, fast and easy to use. The Micro Hair Trimmer by Cricket is a tiny battery operated clipper. It is the perfect size for those hairs that regular sized clippers, trimmers and shears can’t get at. The Micro Trimmer is small enough to trim those pesky nose hairs and gentle enough to get those fine soft hairs that can cause the fuzzy face look on women. The Micro Trimmer trims the fuzz off, leaving your face feeling smooth and soft. (Those soft hairs are always very fine, do not grow back heavier and do not feel bristly when they do grow back. So don't be afraid to use the trimmer.) The Micro Trimmer comes with a guard attachment that makes trimming eye brows or a man’s mustache or beard easy. Use it without the guard to shave the hair on the back of your neck. One AAA battery runs the Micro Trimmer for quite a while, giving it enough power for any job I have found for it. Smooth Away This product uses no chemicals but removes unwanted hair while it also exfoliates the skin. This leaves skin feeling very smooth. The effective area of the Smooth Away is a pad covered with superfine crystals that actually buff away the hair and the dead skin. Smooth Away comes with two rubber applicators that disposable pads are attached to. The large applicator is large enough to slide three fingers into and is used for areas such as legs, arms and under arms. The small applicator is one finger size and is used for small areas such as the upper lip and the chin. Each applicator comes with four adhesive backed replacement pads. Just peel off the old pad and stick on a new one. It has often been my habit to skip the instructions and to charge in using new gadgets but in this case be sure to read all of the instructions before using the Smooth Away. The instructions are important. They will tell you to cleanse the area and dry it thoroughly without using creams or moisturizers prior to using the Smooth Away. This is important. It won’t work without following this step. To remove the hair, gently buff the area in circular motions – first clock-wise and then counter clock-wise. Be firm but gentle. Pressing too hard can cause irritation. Remember that the pads are covered with tiny crystals that remove the hair and exfoliate. If your skin is sensitive, it is wise – and suggested on the package – to use it on only a small area and then wait 24 hours before proceeding to see if irritation occurs. When used correctly, Smooth Away does exactly what it claims and makes shaving, waxing and chemical depilatories unnecessary (I purchased both of these products with my own money and was not paid to review them.)
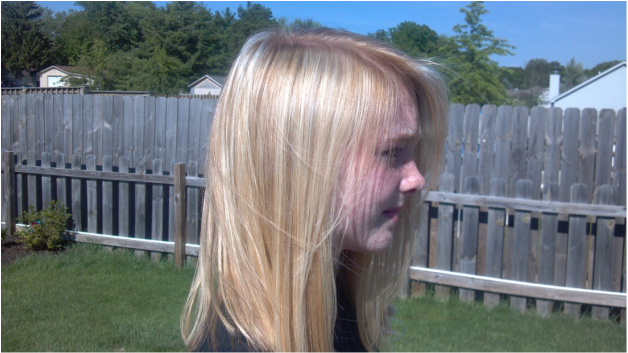 Always glamorous, often soft and even child-like in appearance; blonde hair is one of the most desired hair colors in almost every country. However, those who have it often find that they want a change. The following suggestions are subtle, natural looking ways to enhance the beauty of your blonde hair and give you an updated fashion.
Dry, cracked and old looking feet are sure to make you feel unattractive. You can hide them in shoes and socks and ignore them but sooner or later,
you are barefoot and there they are. You can put on the prettiest sandals and even paint your toenails but if there is whitish looking dead skin around your heels and on the sides, the look screams “old and neglected.” Pampering yourself with regular professional spa pedicures is a great remedy and a nice treat but it can be very costly. Professional pedicures are an unnecessary expense because keeping your feet soft and youthful looking at home is easy. Keeping your feet beautiful takes only a few minutes each day in the shower and about 10 to 20 minutes every other week.
Brazilian Smoothing treatments are one of the hottest products for smooth silky hair.
I decided to try Keratin Express Brazilian Smoothing Treatment because the literature states that it has no formaldehyde. Keratin Express is a conditioning treatment that only takes about 35 minutes and lasts about 6 weeks. I was told that it bonds keratin (keratin is the protein that hair is made of) to the hair to condition, repair and smooth. I was most interested in its ability to prevent frizz by locking out humidity. I was told that after the treatment I could wear my hair either straight or curly and it would be smoother and have less frizz. My hair is very curly. I sometimes wear it curly but most often blow it out and use a flat iron to wear it straight. In the winter, with low humidity and the use of serums and smoothing creams my hair will stay smooth and silky. However, in the summer, in higher humidity, with the use of lots of serums, smoothing creams and lots of work with the flat iron, I can smooth my hair but frizzy ends develop as soon as I get out into the weather. The Keratin Express treatment was a simple process:
Keratin Express gets an A+ from me. (I purchased Keratin Express with my own money for my personal use and was not paid for the review.) |
AuthorLynne Chapman served as Hair Site Editor of BellaOnline.com for fifteen years. She is a professional stylist and colorist of more than forty years. Categories
All
|
|
|